
Kitchen Island Slab Sizing: Practical Proportions for Great Rooms in Boise and Nampa
A long kitchen island raises a question that has nothing to do with color. Can the top be made from one piece of stone, or will it have a seam? The answer depends on three things, and all three are easy to settle before you choose a quartz or granite color. The first is how big the island will be. The second is how big a slab comes in for the stone you want. The third is whether you want details that use extra stone, such as a waterfall end or a backsplash made from the same slab.
As a general rule, an island up to about nine or ten feet long, with seating along one side, can usually be made from a single slab. An island longer than that, one with seating on both sides, or one with a waterfall end will often need a seam or a second slab. Neither is a problem when it is planned early, and each part of the decision is simpler than it sounds.
What a slab is, and how big one comes
A countertop starts as a slab, which is a single flat sheet of stone longer than a sofa and wider than a doorway. Every countertop in the kitchen, the island included, is cut from slabs like that, so the size of the slab is the first limit on the size of a one-piece island.
Quartz is made in a factory, so each brand sells its slabs in one or two set sizes. The usual size is about ten feet long and four and a half feet wide. Many brands also make a larger jumbo slab that is half a foot to a foot longer and a little over five feet wide. A few now make an even larger size for very big islands. Not every color comes in every size, so the jumbo question is worth asking about the exact color you like.
Granite, quartzite and other natural stones are cut from blocks taken out of a quarry, so their slabs vary more. Many are close to a standard quartz slab in size, some are shorter, and a few are longer. The size that counts is the one written on the tag of the slab you are buying, which is one reason it helps to see the actual slab rather than a small sample.
One more thing shrinks a slab a little. The shop that cuts it, called the fabricator, trims the rough factory edge off each side and steers around any chip or unwanted vein. That takes an inch or so off each edge, which is why a ten-foot slab gives you an island a little under ten feet long rather than exactly ten.
The three measurements that decide the top
Length is the easy one. Measure the run of island cabinets from end to end and add the small lip the countertop hangs past the cabinets at each end, which is usually an inch or two. If that total is under about nine feet, a standard slab covers it. Between nine and ten feet, it takes a jumbo slab. Past ten feet, you are into a seam or a second slab.
Depth is the one most people miss, and it is the measurement that most often pushes an island past one slab. A slab is only about four and a half feet wide, or a little over five feet for a jumbo, and the depth of the island has to fit inside that width. The three common island layouts come out very differently.
- An island with cabinets on one side and a seating ledge on the other is about three feet deep. Any slab covers that.
- An island with cabinets on both sides, back to back, and no seating is a little over four feet deep. A standard slab still covers it.
- An island with cabinets on both sides and a seating ledge as well is close to five feet deep. Only a jumbo slab covers that in one piece.
Overhang is the part of the top that hangs past the cabinets. The small lip on every edge is nothing to worry about. The seating ledge is different, because it has to be deep enough for a person’s knees, and that depth is what turns the four-foot island into the five-foot one in the list above. If the island you want lands in that last case and the color you like is not made in jumbo, changing the color is usually easier than shrinking the island.
The counter along the wall in the kitchen below is the easy case, with cabinets on one side, the small lip of overhang in front and nothing added for seating.
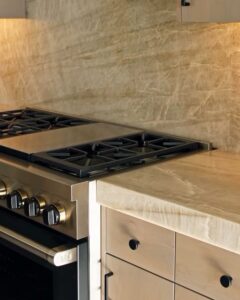
It is a Boise kitchen our team shared on Instagram this October, and the stone running up the wall behind the range is a detail that comes up again further down this post.
How many people can sit at the island
Seating sets the length of the island as much as the slab does. Each person at a counter needs about two feet of width, so a six-foot island seats three in a row and a ten-foot island seats four with elbow room. If you want more seats than the long side holds, the choice is a longer island or stools on two sides. Stools on two sides push the depth into the five-foot case that needs a jumbo slab.
Knee room is the other half of seating, and it depends on the height of the counter. Most islands are counter height, about three feet off the floor, and a seating ledge at that height needs to hang out a little over a foot so knees fit under it. A raised bar section, a few inches taller, can get by with a slightly shallower ledge because people sit more upright on a bar stool. A lower, table-height section needs a deeper one. That is why the seating ledge counts so heavily in the depth of the slab, and why a fabricator will ask how tall your stools are before anything is cut.
How the island should sit in the great room
The measurements set the limits. The look of the room decides the rest, and it helps to picture the two kinds of island separately.
The first kind is a big, deep island with stools on two sides. Picture a dining table made of stone, standing in the middle of the room, with people facing each other across it. An island like that becomes the center of the great room, and the sofa, the television and the dining area all arrange themselves around it. It needs a jumbo slab or a seam, and it needs a full walkway on every side.
The second kind is a narrower island with stools along one side only. Picture a long counter that belongs to the kitchen, with the stools facing the cook and everyone’s back to the living room. An island like that keeps the view open from the front door through to the windows or the fireplace, fits a standard slab, and leaves more of the room for furniture.
Whichever kind you choose, two habits keep it in proportion. Stop the island a foot or two short of the cabinet wall it faces, so the walkway at each end matches and the kitchen does not feel boxed in. Keep the island shorter than that cabinet wall, because an island longer than the counters behind it makes the kitchen look crowded from the living room. Settle which kind you want first, because that choice tells you whether you need a jumbo slab at all.
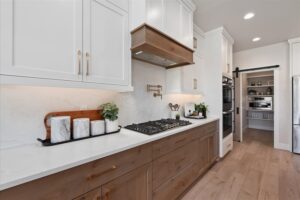
The second habit is easier to picture with a cabinet wall in front of you.
The kitchen below is in a Parade Home in Nampa built by Gingrich Homes, where our team did the tile, laminate and carpet. An island in that room would be kept a little shorter than the counters along the range wall.
When an island top needs a seam
If the island is longer or deeper than one slab allows, the top is made from two pieces joined with a seam. A seam is a narrow joint where two edges of stone meet, filled with a hard adhesive tinted to match the stone and polished flush. On a plain or lightly speckled stone it is a thin line you have to look for. On a stone with bold veins it shows more, so the fabricator cuts both pieces so the veins line up across the joint, which often means taking both pieces from the same slab.
Where the seam goes matters more than how it is filled. The seam needs solid cabinet under it, so it never lands in a seating ledge where people lean. It stays several inches away from the corners of a sink or cooktop opening, because the stone is narrow there and that is where a crack would start. Where there is a choice, the seam goes toward the end of the island nearest the wall rather than the middle, where the pendant lights would catch it. A good fabricator will show you the seam on the drawing before the slab is cut, and that is a fair thing to ask for.
Some island shapes make the seam easy. An L-shaped island, with a short wing at one end for seating, has a natural joint at the inside corner, and each part fits a normal slab. An island with a raised bar along the back joins at the step. The hardest case is a single flat top of twelve feet or more. That takes either one of the extra-large slabs a few quartz brands make, or two slabs chosen together so the pattern matches at the joint. For an island like that, seeing the actual slabs side by side is worth the trip.
A seam has to be planned around veining like the stone below. It is a close-up from a reel of countertop projects we shared on Instagram this fall, a white stone with gray veins running across it. On a stone like this, the seam is only as good as the pattern match on either side of it.

Waterfall ends and stone backsplashes use extra slab
A waterfall end carries the countertop down the side of the island to the floor, so the stone looks like a single sheet folded over the corner. It has become a popular detail in newer open-plan homes, and it is one of the most common reasons an island that fit one slab on paper ends up needing two. The piece that runs down the side is about three feet tall, so each waterfall end uses roughly three feet of slab length on top of what the island itself needs. An eight-foot island with one waterfall end is already more than most jumbo slabs can give in one piece, and an island with waterfall ends on both sides almost always needs a second slab.
A backsplash cut from the same slab works the same way. Stone carried up the wall behind the range looks like one continuous surface with the counter, but every square foot of it comes out of a slab as well. It belongs in the plan from the start rather than as an afterthought.
Both details change the order of the work as well. A waterfall end stands on the finished floor, so the flooring has to be in before the stone. On a veined stone, the fabricator lays out the top and the side piece together so the pattern turns the corner the way you expect. That layout is worth seeing on the slab before the saw starts. When a second slab is needed, it should be chosen at the same time as the first so the color and pattern match.
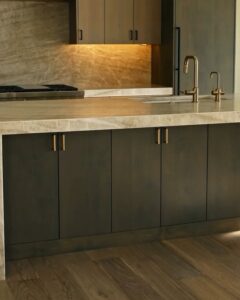
The island below has both of those details at once, in the same Boise kitchen as the range wall earlier in this post. The picture comes from the reel of countertop projects on Instagram that the veined stone above came from. The corner where the top folds into the side piece is the layout worth seeing on the slab before the saw starts.
Sinks, cooktops and outlets in the island
A sink or a cooktop in the island adds an opening to the top, and an opening changes the slab plan in two ways. The first is strength. An opening leaves a narrow strip of stone on either side, so the fabricator keeps the seam well away from it and adds support under the strips if they are narrow. The second is landing space. The same planning guidelines ask for a stretch of counter on each side of a sink and of a cooktop, so there is somewhere to set down a wet pan or a hot one. That pushes a working island toward eight feet or longer. If the island is mainly for seating and food prep, keeping the sink in the perimeter counters is the simplest way to keep the island smaller and free of seams.
Outlets are the detail most often forgotten. A pop-up outlet or charger in the top of the island needs a hole cut in the shop rather than on site, so it has to be on the drawing before the slab is cut. Your electrician can tell you what the local code asks for on an island, and the fabricator needs to know the exact spot and the size of the fitting.
Edges and thickness
Most island tops are cut from slabs a little over an inch thick, which the trade calls three-centimeter stone. That thickness is stiff enough to carry a normal seating ledge without a frame under it, and it gives the edge a solid look. Thinner two-centimeter slabs are lighter and often cost less, but they need a support frame and a doubled-up edge to look the same, and our guide to overhangs and support explains where that support goes.
The edge profile is the shape of the countertop’s outer edge, and most people pick it last. A plain squared edge with the sharp corner softened is the most common choice on an island, because it suits modern cabinets and is easy to wipe clean.
A rounded edge is gentler on hips and on small children. A thicker-looking edge, where the stone appears two or three inches thick, is made by gluing a strip of the same slab under the edge. The corner is then cut at an angle so the joint disappears. It looks substantial on a big island, but those strips come out of the slab too. A thick edge on a long island can be the detail that tips it from one slab to two.
Which material suits a big island
Quartz, granite and quartzite all make good islands, and part of the choice is about the size of the slab. Quartz comes in set sizes, including jumbo in many colors, and its pattern is consistent from slab to slab, so a two-piece island is easier to match and a seam is easier to hide. Granite is a natural stone, so every slab is different and the size depends on the block it came from. A one-piece granite island depends on finding a slab long enough in the color you like. Quartzite is a natural stone that looks like marble and wears like granite. It often comes with dramatic veining that needs careful matching at a seam, so for a big quartzite island it pays to pick both slabs together.
The day-to-day differences, such as heat and stains, are a separate question, and our guide to quartz versus granite for Boise kitchens covers them. For the sizing question alone, the practical order is to find the color you love, ask which slab sizes it comes in, and let that answer shape the island.
The floor under the island
An island and a new floor often arrive in the same remodel, and the order they go in depends on the floor. Tile and glued-down or nailed-down hardwood are fixed to the subfloor, so they go in first and run under the island, and the cabinets sit on the finished floor. Floating floors need the opposite order, because they are not attached to the subfloor. Luxury vinyl plank, laminate and click-together engineered wood need a little room to move as the house warms and dries through the year. If a heavy island is set on top of a floating floor and fastened through it, the floor is pinned in the middle of the room and the planks around it can lift or gap. Flooring makers such as COREtec say that a floating floor under cabinets or an island has to be glued down in that area instead. In a new kitchen the simpler approach is to set the island on the subfloor first and run the floor up to it. The small gap the floor needs is hidden under the base of the cabinets.
A floor that runs up to the island is what that looks like once the kitchen is finished. The pictures below is the finished side of a before-and-after our team shared on Instagram this November, where old laminate came out and new luxury vinyl plank went in. The planks run up to the base of the island and the cabinets along the wall.
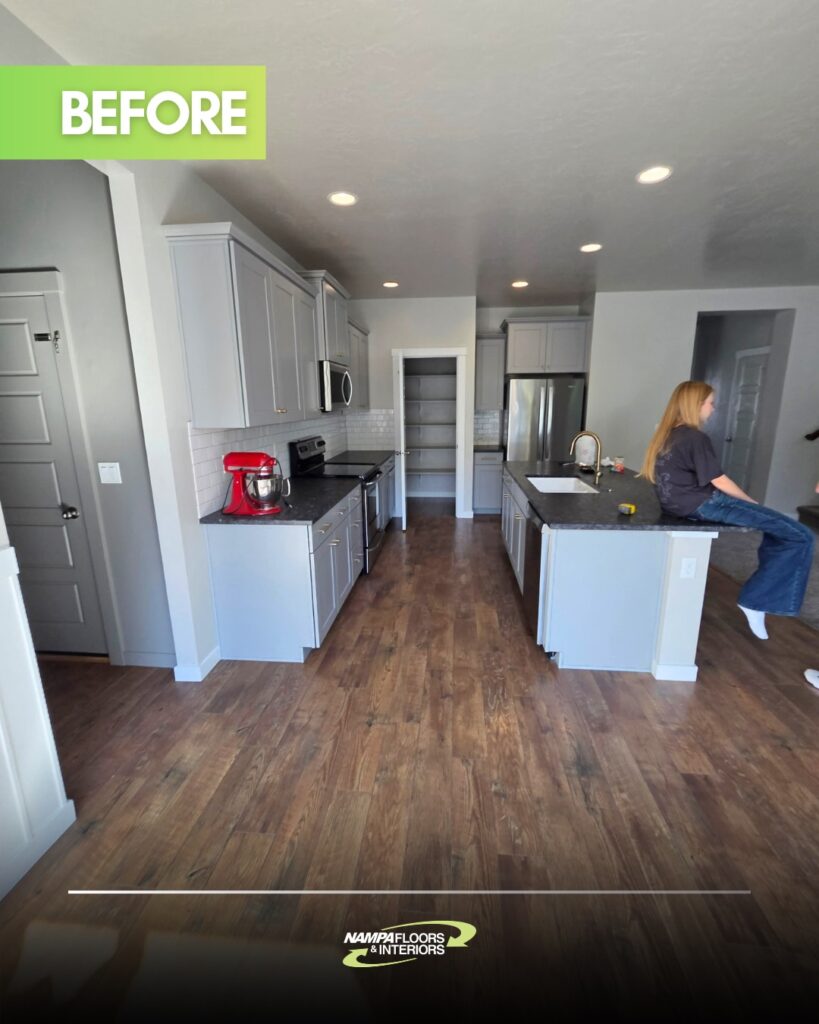
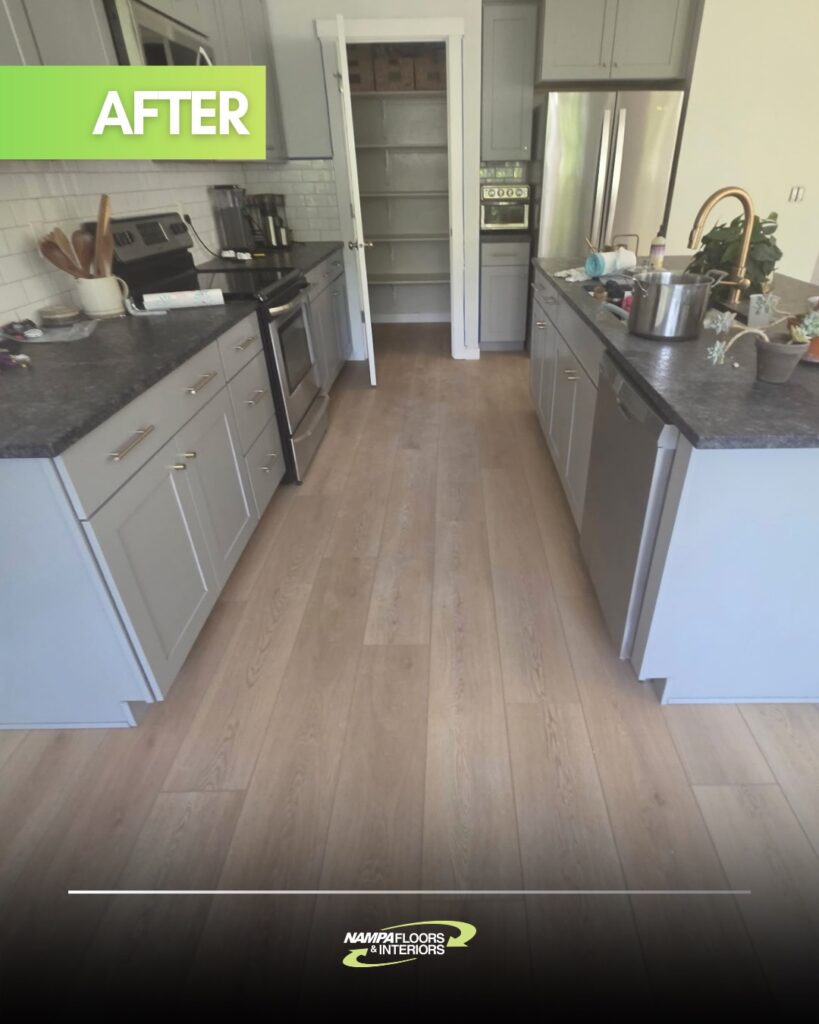
The weight of the top matters here as well. A stone island top weighs several hundred pounds before anything is set on it, so the island needs a flat, solid subfloor underneath, and the flooring itself is not part of what holds it up.
The last decision is color. It is easier to choose a counter that suits the floor than the other way around, because the floor is the largest surface in the room and the island top is the second. Bring a plank of the flooring to the slab, or a slab sample to the floor, and look at the two together in daylight. Warm wood tones and cool gray veining can clash across a big room, while a cream or taupe-veined stone on the same floor tends to tie the room together.
How the job runs
The countertop side of a kitchen project follows the same steps whether the island is one slab or two. It starts with a visit to the showroom to look at slabs and samples and talk through the island, which is where the one-slab-or-two question usually gets answered. Once the cabinets are installed, a technician comes to the house and measures them, including the overhangs and any openings for a sink, a cooktop or an outlet. That measurement becomes the drawing the stone is cut from. The fabrication shop then lays the pieces out on the actual slab, cuts them, polishes the edges and, for a two-piece top, matches the pattern at the seam. On install day the pieces are set, leveled and joined, the stone is sealed where it needs it, and the sink and cooktop go in afterward.
The stone is usually the last big thing to arrive in a kitchen, because it cannot be measured until the cabinets are in. That is why the floor, the cabinets, the appliances and the stool height all need to be settled before the measuring visit. A change of mind after the slab is cut is the expensive kind.
The measuring visit itself looks like the video below. Matt from our team is measuring a run of base cabinets with a digital mapping tool before the slab is cut, and every step after this one is built on that measurement.
Before you shop for a slab
A few things settled ahead of time make the showroom visit short and the quote accurate.
- Measure the island cabinets, length and depth, and note whether they sit on one side or back to back. Depth is what decides whether a standard slab is wide enough.
- Decide how many stools you want and on which sides, since seating sets the ledge and the ledge adds to the depth.
- Decide whether a sink, a cooktop or an outlet goes in the island. Those openings limit where a seam can go, and they have to be on the drawing before the cut.
- Settle waterfall ends, a stone backsplash and the edge profile now rather than later, because each one can add slab to the order.
- Know what the floor will be and whether it is already in. A floating floor goes in after the island, and a fixed floor goes in before it.
With those in hand, a fabricator can tell you in one visit whether your island comes from one slab or two, and what that means for the quote.
Questions we hear most about island slabs
Can a twelve-foot island be one piece?
Only with one of the extra-large slabs a few quartz brands make, and only in the colors they make at that size. Otherwise it is two slabs with a planned seam, which on a plain stone is barely visible.
Will I see the seam on a two-piece island top?
On a plain or speckled stone, only if you look for it. On a veined stone the fabricator matches the pattern across the joint and keeps the seam away from the middle of the island, so it is easy to live with.
Does a waterfall end mean a second slab?
Often, yes. Each end uses about three feet of slab, so an island longer than about eight feet with one waterfall end, or almost any island with two, needs more than one slab.
Do I need a jumbo slab?
Only if the island is longer than about nine feet, or deeper than a standard slab is wide, which mostly means an island with cabinets on both sides and a seating ledge.
Can the island sit on my new floating floor?
Not fastened through it. Either set the island on the subfloor and run the floor up to it, or have the flooring under the island glued down, as the flooring makers ask.
Can I see the island laid out on the slab before it is cut?
Yes, and it is worth asking for, especially on a veined stone or with a waterfall end, so you know where the pattern and any seam will land.
Plan the island on the real slab with Nampa Floors & Interiors
Our family has helped Treasure Valley homeowners with floors and countertops since 1954. We source quartz, granite and natural stone slabs directly and cut them to fit the cabinet layout in your kitchen, so the question of one slab or two gets answered on the actual stone. Bring your plan, or a photo and a few measurements, to the Nampa Super Store at 2121 E Plaza Loop, the State Street showroom in North Boise or the Maple Grove showroom in South Boise. We will help you work out what your island needs. Financing is available if the island and a new floor are going in together. When you are ready, schedule your free in-home measure and estimate and we will measure the cabinets and the room before any stone is cut.
If you are planning the whole island, our guides on countertop overhangs and support, quartz versus granite for Boise kitchens, countertops in South Boise and flooring transitions in open-concept remodels cover the rest.
Get Quote
Fill out the form and we will email your coupon
"*" indicates required fields